Call:
416-669-4247
Book Inspection
To book an appointment, please contact us, we look forward to helping you!
To book an appointment, please contact us, we look forward to helping you!
Sloped and flat roofs, Chimneys, Plumbing Stacks, Roof Vents, Skylights, Electrical Mast, Eavestroughs, Downspouts, Soffit/Fascia and all Flashing components
Wall Finishes, Windows & Doors, Decks & Porches, Driveway & Walkway, Retaining Walls, Lot Grading, Garage
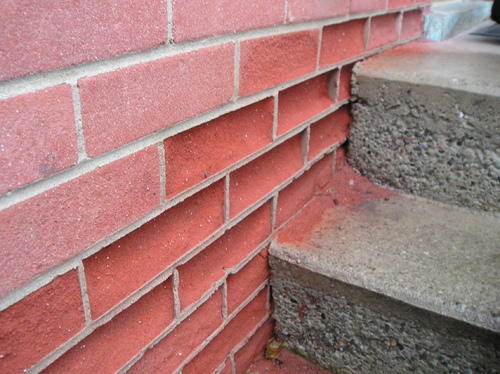
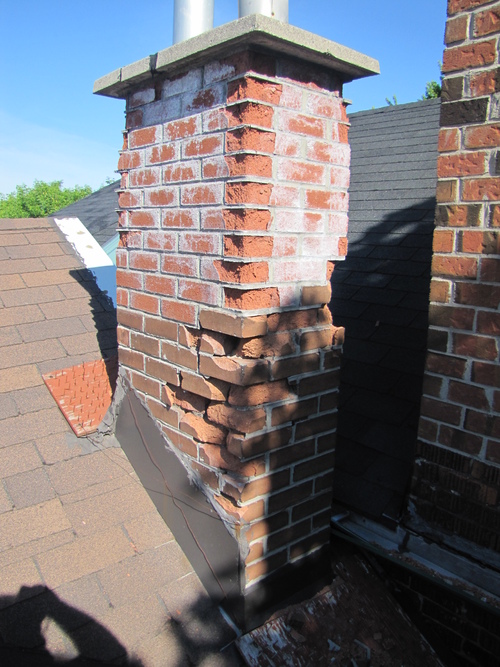
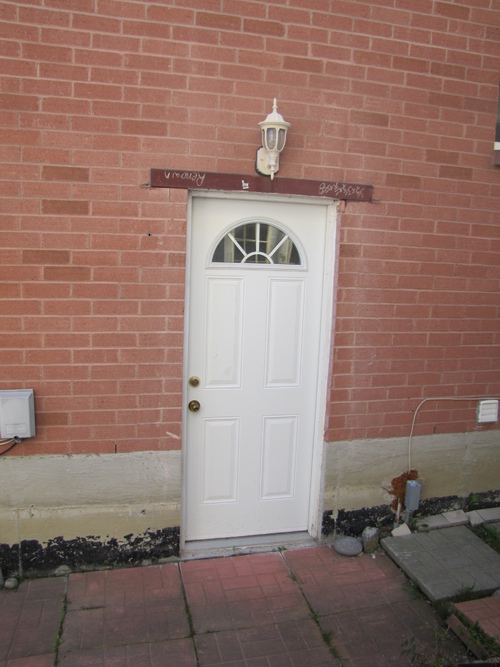
The failure of the brick face is fascinating from a home inspection perspective because of the nature in which the material has disintegrated and left the mortar behind. The causes could be from salt to perpetual moisture from snow build-up and water flowing off the steps. A licensed Mason was required for evaluation and repair.
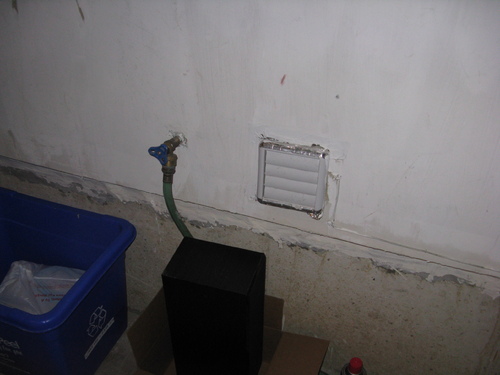
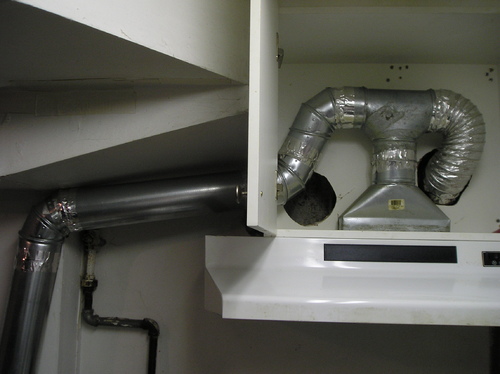
This is the inside of a garage. The exhaust hood you see is from a bathroom the owner installed in the basement and is exhausting moisture into the garage. Not only is this not allowed it’s a life threatening situation because it provides entry of dangerous exhaust fumes from the car back into the home via the bathroom duct and fan. It will be a costly endeavour to relocate the exhaust hood considering the bathroom is finished.
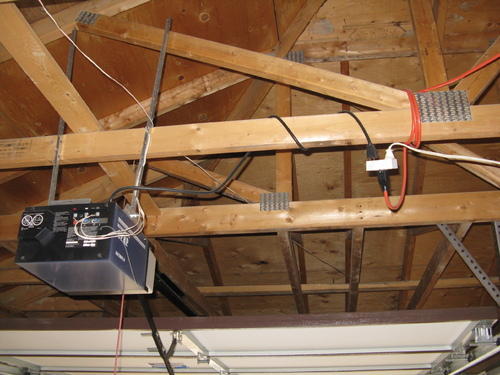
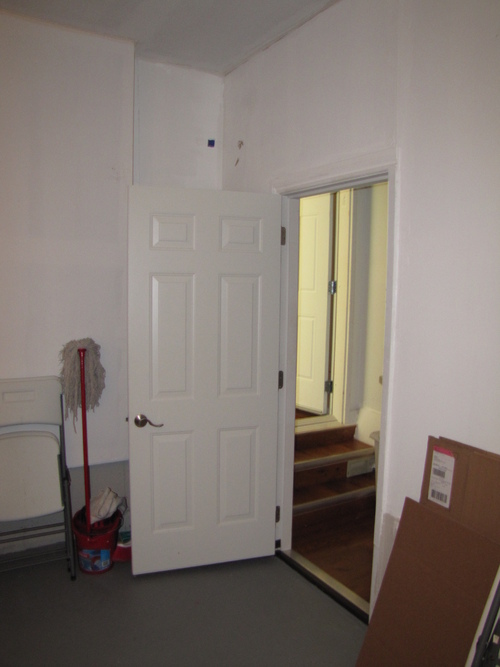

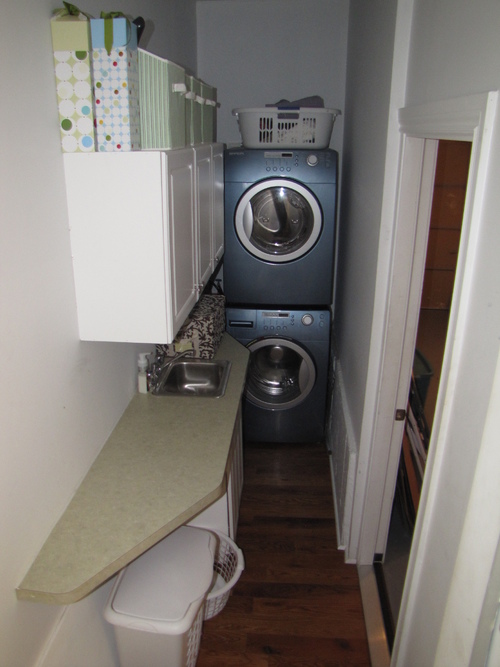
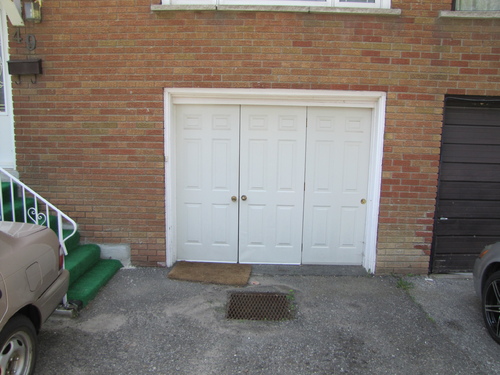
The three pictures combined will help you understand the issue with this garage area of a condominium townhouse.
Conclusion – the Condominium Corporation was not consulted with respect to the construction of this area of the garage and nor were any permits obtained. Depending what the Condo Corporation’s covenant states – they could rule to have the entire area removed and restored to original construction, which would be an expensive proposition.
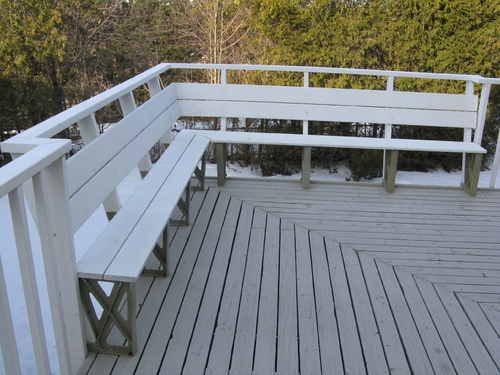
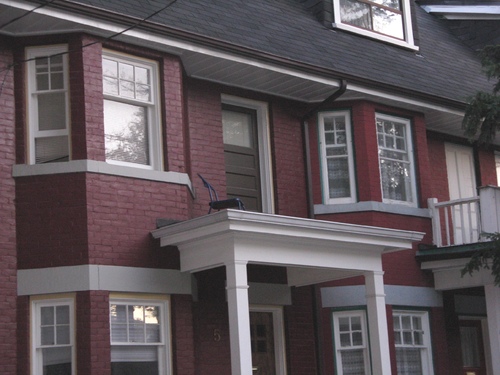
This bench is an attractive and functional aspect of any deck area however it presents a safety concern for children who can fall through either of the openings at the top rail, between the back rest and seat as well as under the bench. Even if these areas were not opened, deck benches in general are climbing hazards for children who love to climb.
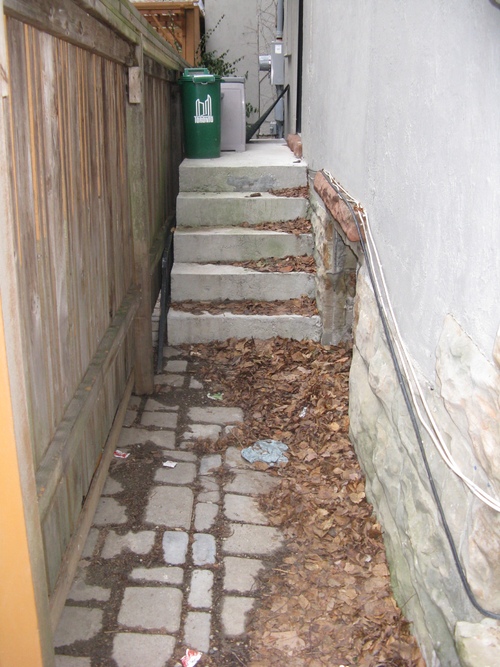

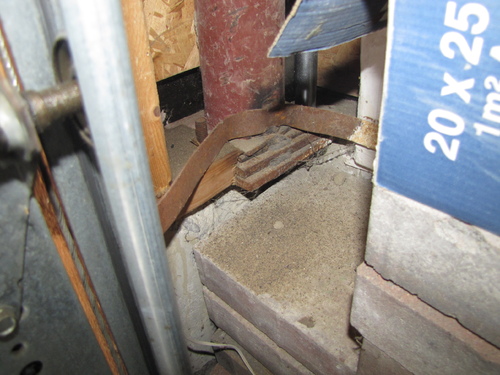
These formed concrete steps look normal from the front view – however a guard should be installed down the left hand side of the stairs to protect against falling on the fence side of the steps. The look from behind was altogether different and very concerning in terms of the structural integrity of the construction – can you trust that the concrete pier is at the required depth below grade and not going to be subjected to frost.
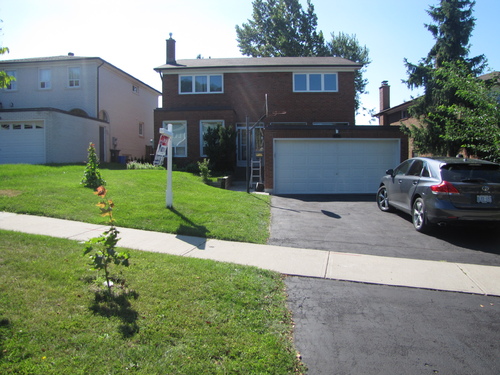


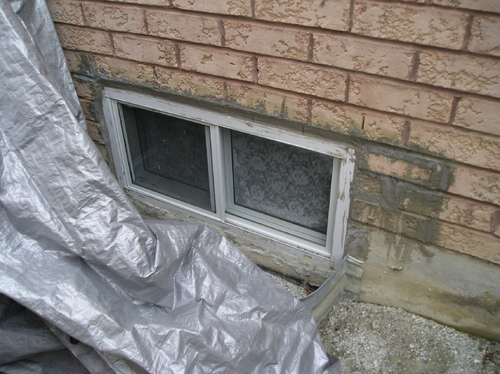
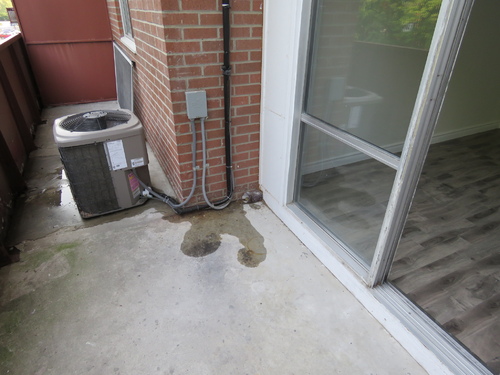
When buying a home you have to consider all aspects including its location and you know what they say about location. This house is at the bottom of the street which means runoff from rain and melted snow will end up near the home. You can see from the next picture that the homeowner has had to install drainage provision in order to protect against water infiltration to the affected side of the home. Grading toward the foundation is one of the biggest reasons for basement moisture infiltration.
Exterior Walls, Foundation Walls, Floor Structure, Support Columns and Beams, Roof Structure & Sheathing, Fire Walls/Separations (when applicable)
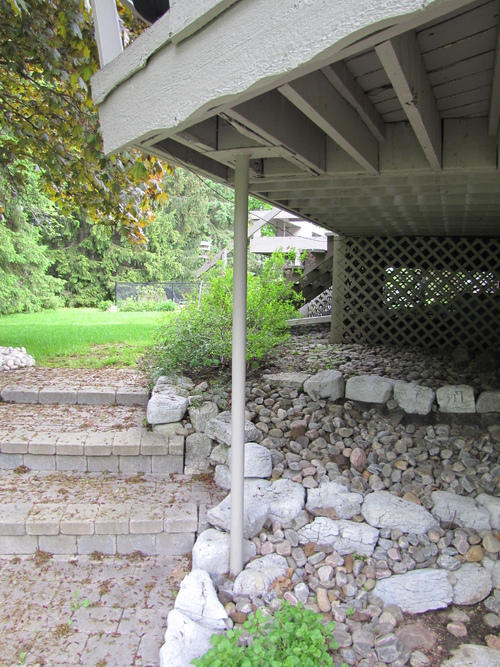

This structural column is providing support for a considerable portion of the deck and is structurally inadequate in all aspects from what you can see. However the most concerning deficiency about this column is in the next photo. The inspection of structural components requires consideration of the entire situation (if visible of course) therefore inspecting the base of the column to determine how it is supported is imperative. You couldn’t see the base of the column because it was obstructed with rocks. So, some of the rocks were removed and as you can see the column is rusted out and susceptible to failure which will invariably lead to potential collapse of this deck structure if not replaced.

This photo was taken during a Tarion Warranty Inspection. The joist was notched to accommodate the installation of a Plumbing Stack. Joists are not allowed to be notched on the underside period, because it weakens the framing member as well as the structural components that it supports.
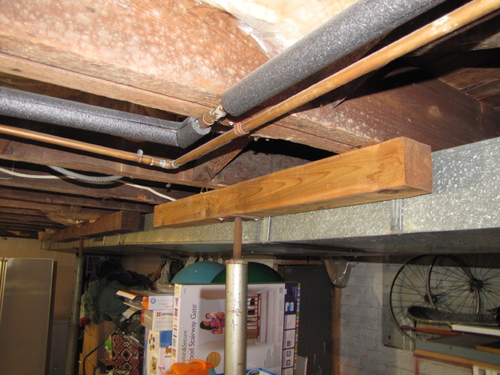
Structural support columns that are added post construction for additional support or to shore up a failing part of the structure require a permit and a Structural Engineer to determine the type of support and how it is to be constructed. This column was installed without the aforementioned and therefore was required to be reviewed by a Structural Engineer for further evaluation.

The column supports one end of a steel beam for the garage opening. You can see the concrete wall is considerably broken off at the edge below the column base plate & shims. More than half of the plate / shims are inadequately supported and susceptible to failure. The wall had to be repaired to provide a proper support base for the column.
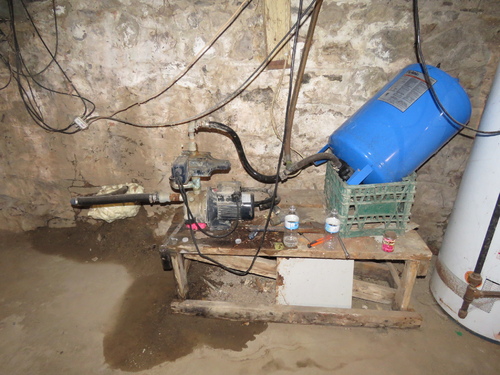

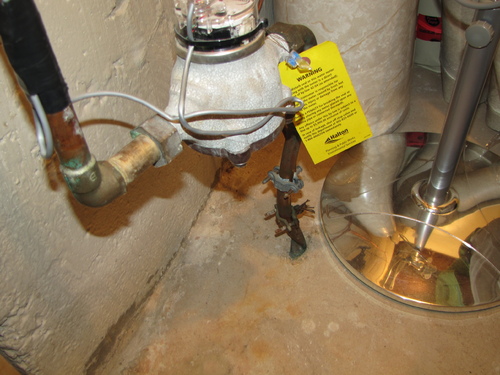
The rubble foundation for this home built in the 1800’s, began leaking during the inspection. There were obvious signs in the area of the well pump that it had been leaking for some time. Below the cable T.V. wires you can see how saturated the wall is. The well was just outside this wall at the threshold of the front entrance which you had to step on to get into the home. We won’t get into the issues with the well pump – besides it is beyond the scope of this inspection.
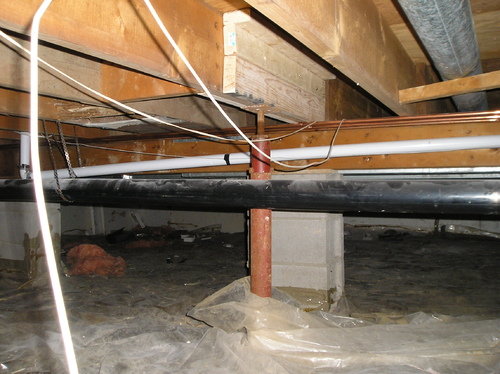
As you can see from this photo the house structure is being supported by steel columns screwed into 4 x 4 posts – what you can’t see is that the other half of this basement is supported the same way. The columns however do not have footings and are just placed on a thin concrete floor. This area of Toronto used to have active rivers running beneath it.
Ceiling, Walls and Floors, Cabinets and Counters, Stairs and Guards, Fireplaces, Windows & Doors, Exhaust Fans
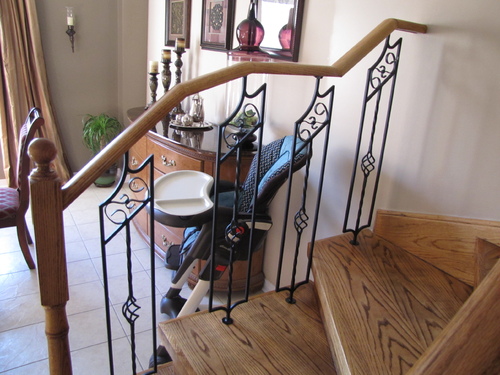
The guard for this set of stairs is aesthetically appealing however it fails to provide the very thing it was designed to do and that is – protecting little ones from falling through the gaps. The gap between any guard baluster should be no more than 4 inches and as you can see this guard does not meet this standard. The stairs are the number one area for accidents in the home – leading to life threatening injuries.
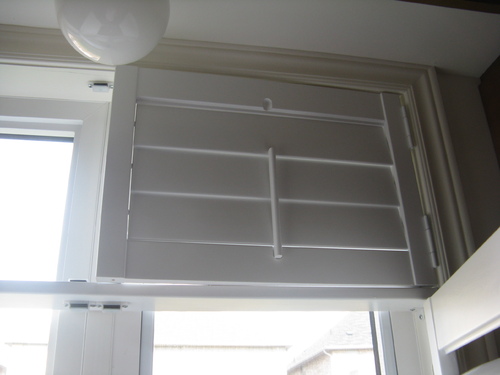


It is important to test every window in the home because you never know. When opening these shutters above the lower level windows over the Kitchen sink, I was not fortunate enough to get out of the way – so they fell on me – better me than my client. As you can see in the next photo the hinges for the shutters were not even fastened to the frame.
The exhaust duct setup for this range hood fan is just one of many reasons that make this profession so intriguing. The owner connected the range hood fan duct and the dryer duct together. The duct you see coming in from the left hand side of the photo is from the dryer. Lint, grease and moisture combined in one duct was a disaster waiting to happen. Owners will tell you though, they are proud of their ingenuity!
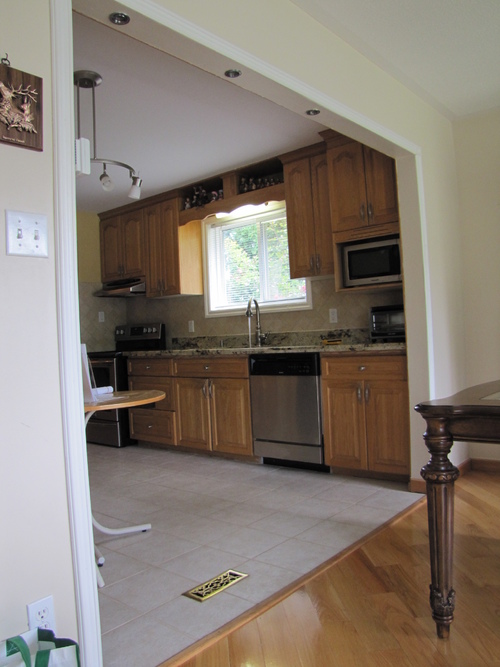
Open concept living it seems is what everyone desires these days however it is important to identify walls that have been removed or altered especially if they are load bearing in nature. The era in which the home was built helps in knowing that openings like this did not exist long ago. This opening was made larger to try and accomplish that open concept design. The pot lights installed in the door frame and the register in the entrance way to the Kitchen is evidence enough.
Most all homeowners will not tell you that they have a rodent issue or put the traps out in the open. If you look behind the stove or in the cupboards you will likely find the answer.
Gas Lines, Gas Meters, Oil Tanks (Above Ground Only), Propane Tanks, Furnace, Filter, Humidifier, Air Handler Fan, Air Intake for Combustion, Exhaust, Ductwork & Registers, Return Air, Thermostat, Boilers, Electric Baseboard Heaters, High Velocity Systems (Combo Systems), Heat Pumps, Wall Heaters

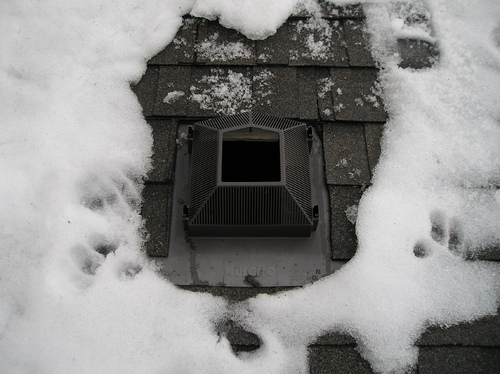
The majority of homes today are heated by natural gas. The inspection of the heating system, if heated by natural gas, should begin with the gas meter. The gas meter delivers natural gas to the gas fired appliances in the home. If the meter is at all compromised it can result in malfunction of the appliances and more importantly the safe operation of the meter in delivering the gas. In this photo the gas meter is too low to the ground and based on average snow accumulation for certain regions / municipalities the meter should be at least a foot from the ground. A gas meter covered in snow can damage fittings and pipes causing leaks as well as affect the function of controlling the gas pressure. The local utility should be called to increase the height.
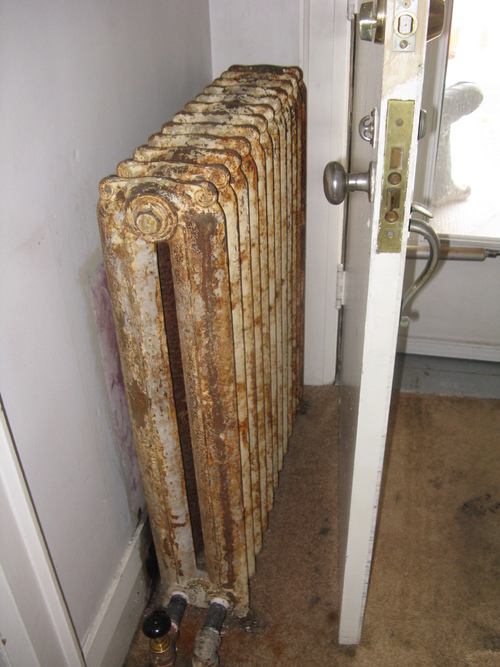
If your house has cast iron radiators and they look like this one does – there are plenty of opinions out there about how rust and certain paints, metallic vs. non-metallic, can affect heat transfer. Cover or encasing your radiators can also have an effect on heat transfer. The best advice is to consult with an HVAC technician who is well versed in heating systems with radiators for guidance in order to achieve efficiency and safe operation of your radiators.
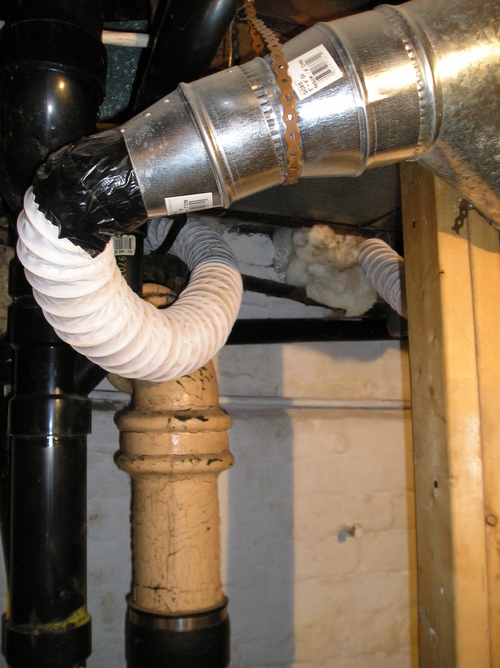
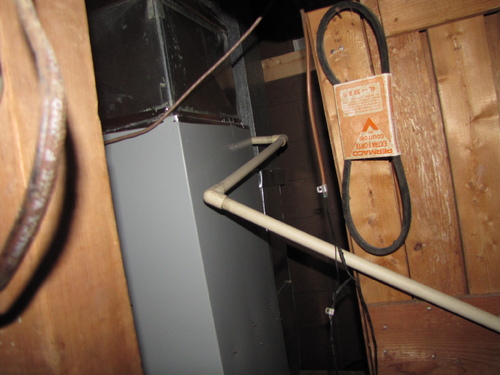
This ducting was added by the owner to provide conditioned air to the extension of their home. As a matter of fact - this flexible white vinyl duct is prohibited for use in dryers by dryer manufacturers because they are known to be flammable so it’s safe to say that it is inappropriate and unsafe for HVAC systems. Also, installing additional supply ducts cannot be done without heat/loss calculations and requires permits to do so.
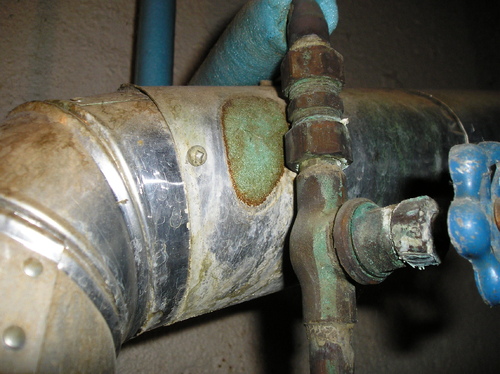
Galvanic reaction occurs when dissimilar metals are in contact with each other resulting in an accelerated corrosion rate of the weaker metal. In this photo the exhaust duct for the water heater is in contact with the copper pipe. Exhaust gases are expelled via this duct so if a hole in the metal were to develop it can exhaust the harmful gases into the home. This pipe was in need of replacement and a CO detector recommended in the furnace room.
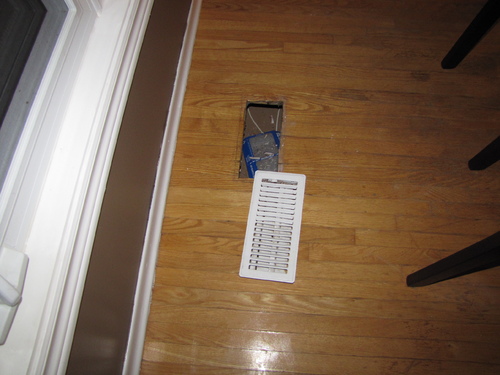
Floor registers should be checked for air flow and if you don’t feel any air coming from them you’ll know why when you remove them. Safe to say this will require considerable work from the HVAC technician to try to get conditioned air to this room.
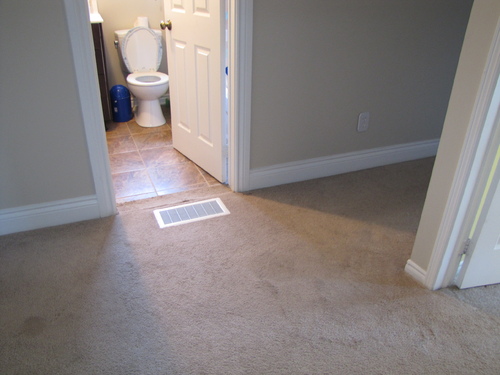
This return air vent is in the middle of the entrance way of the bathroom. Not a likely location for return air or supply air registers for that matter. The reason, the original bathroom was divided into two smaller bathrooms. It’s not so much that the return air is where it is – it’s that it provided me with clues that reconstruction had taken place and of course the additional bathroom was installed without permits.
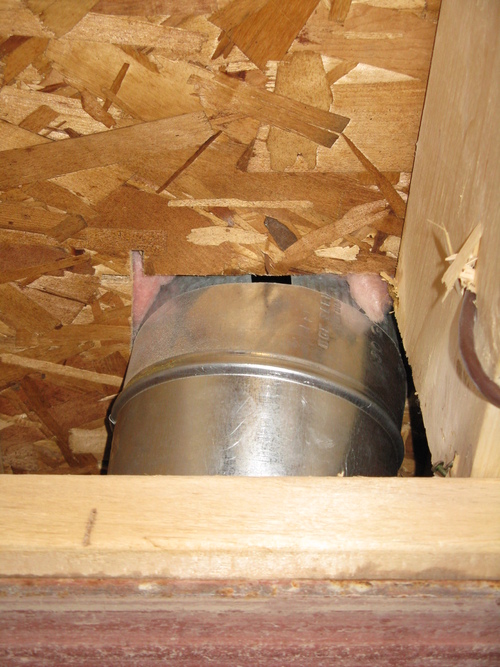
When visible, all ducting should be checked to ensure the conditioned air is making it to its destination. You can see that the connection of the ducting was not properly made and as a result air is escaping into the joist space.
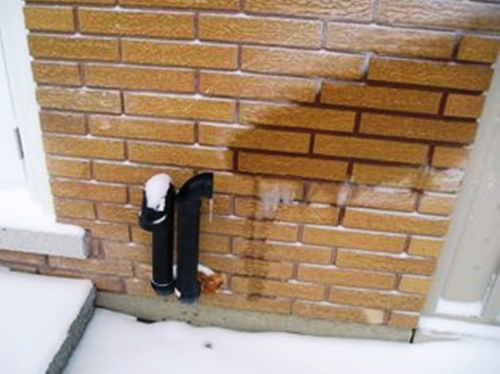
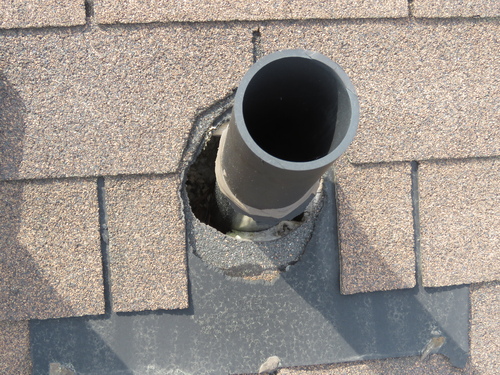
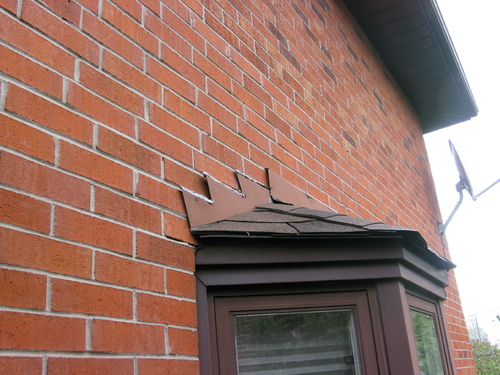
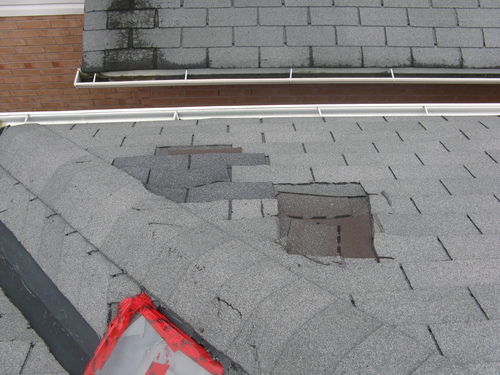
The exhaust pipe on the right needed to be raised a little higher and faced outward. This would have avoided warm moist flue gases from being exhausted onto the brick surface. Over time the brick face will spall (meaning it will fall off) resulting in expensive repairs.
Condenser Section, Evaporator Section (if visible), Condensate Drainage, Refrigerant Lines, Ductwork & Registers, Thermostat
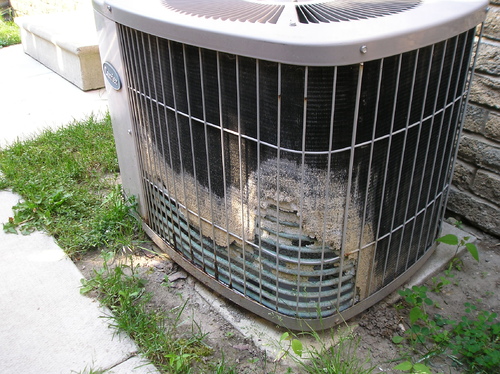
Old Yeller certainly marked his territory with this A/C condenser. Dog urine is very destructive as you can see. It has corroded the aluminum fins and copper coils. What does this mean? Well, the copper coils contain refrigerant which helps to move heat from your home to the exterior – the fins act as a heat sync to help expedite this process. If the coils corrode badly enough, a leak can occur – which means the HAVC technician will have to find it, if he/she can, and repair it. The system will then have to be re-charged with the FREON. If it is R-22 refrigerant then by law the removal, discharge, handling and disposal of refrigerants that contain ozone depleting substances and other hydrocarbons such as CFCs, HCFCs, or HFCs must be performed by a certified technician. Also, with R-22 being phased out it can no longer be done after the year 2020. The fins being damaged means that heat will be expelled at a slower rate which means the unit works harder and uses more energy. To repair this will be costly, almost as much as a new unit because of the complexity involved. Ultimately with this unit it resulted in being replaced altogether.

The A/C in this photo is only 4 years old. The Suction line (larger line wrapped in insulation) for this A/C unit has iced up all the way back to the condenser. There can be many reasons for this occurring such as low refrigerant levels, a leak, an imbalance in the critical charge (which means there should be a prescribed amount of refrigerant in the condenser, the liquid line (smaller line in the photo), the evaporator and the suction line). If an imbalance occurs the system will not operate properly which results in the house not cooling. Of course there are other factors involved that I haven’t mentioned nonetheless the bottom line is this unit needed servicing immediately.


Every A/C unit has a condensate line. Condensation is water vapour that becomes liquid which collects in the evaporator coil drain pan to the condensate drain line. It is important that this line be drained appropriately and safely. It should not under any circumstances be connected to a sanitary plumbing stack or pipe. This has the potential for sewer gases to come back into the system via the condensate line and be dispersed through the home which is not a healthy situation. The condensate should drain near a floor drain or into a laundry tub however ensure there is a 1 inch air gap between the condensate line and the rim of the tub to protect the line from being clogged if the tub fills with water. The condensate must be drained continually to avoid overflowing of condensate in the evaporator drain pan damaging system components and drain completely to avoid stagnant condensate which can lead to the build up of unhealthy contaminants that can be dispersed into the system and the home.
Main Water Supply, Main Shutoff, Water Meter, Distribution Piping, Drainage System, Water Heater, Sump Pumps, Sewage Ejector Pumps, Laundry Tub Pumps, Fixtures – Sinks, Toilets/Bidets, Tubs/Whirlpools, Tubs/Showers, Taps & Faucets, Laundry Tub, Hosebibs
This photo shows the main water supply line into the home which is the copper pipe coming out of the concrete floor. You can see that just where the pipe exits the concrete floor there is an incredible kink in the pipe. The diameter of the pipe has been reduced and therefore restricts water flow to the home. What is incredible is that this pipe did not crack because there is tremendous water pressure coming into the home from the street. A licensed plumber had to be called in to repair this pipe but before that can happen the City will have to locate the curb stop on the property to shut off water to the home coming from the water main.
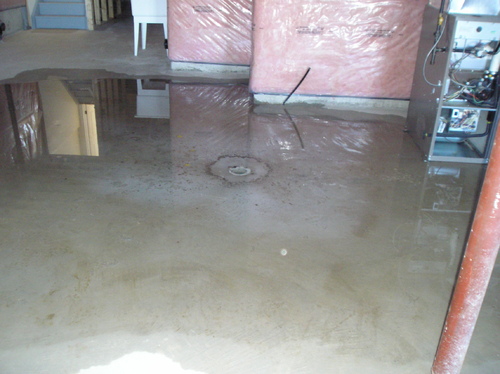
Unless you test fixtures in the home you’ll never know if there is a leak or in this case a backup in the main building drain to the sanitary sewer. I was inspecting this house on a late Friday afternoon – this was a new build less than 1 year old never been lived in and being sold as a resale home. I had just flushed a couple of toilets and ran water at some fixtures when I went downstairs to check for leaks. To my surprise this is what I found. To make a long story short – I used my shop vac to clean up the water, called the builder emergency line for assistance – they weren’t available until morning. What they discovered the next day was a blockage in the building drain which required them to open up the concrete floor to gain access to it and clear the blockage. The system was tested and everything drained as it was designed to do.
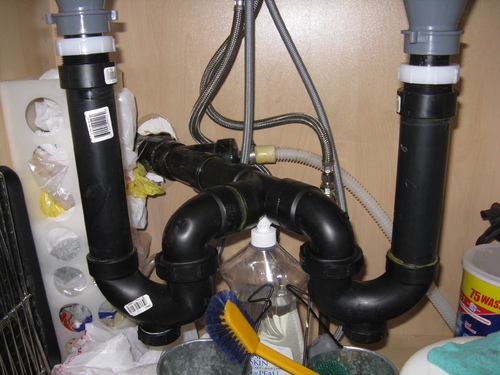
The plumbing configuration for the drainage of this double kitchen sink is referred to as “Double Trapping” (2 P-trap assemblies plumbed in series but not allowed). What is a P-trap? First off, let’s remove the left hand piping (the vertical pipe and the ‘U’ shaped pipe) out of the picture and refer to the right hand piping. You will see that the vertical pipe is connected to the ‘U’ shaped pipe which is connected to a horizontal pipe. Now if you take that whole assembly and flip it vertically, you have formed a ‘P’, hence the phrase ‘P-trap’. What the P-trap does is trap water in the ‘U’ shaped portion of the assembly. This creates the water seal that prevents sewer gases from entering the home. Sewer gases are dangerous because that contain methane which is flammable and is noxious and can make you extremely ill. Double trapping slows down water flow which in turn allows the other drain to become clogged. Traps are designed to be self cleaning so just the right velocity of water is needed to scour the P-trap otherwise it gets gummed up with all sorts of stuff that gets flushed down the sink. The left hand trap can also be ‘Siphoned’ meaning that the water in the trap which creates the seal against sewer gas entry into the home can be drawn out by the rush of water draining from the right hand sink. This leaves the trap with no water seal and subsequently the door is open for sewer gases to enter. There is another problem believe it or not. See the discharge hose for the dishwasher – the white plastic flex hose – well this hose is connected past the traps. This means there is no water seal to protect the discharge hose from allowing sewer gases into the home via the dishwasher, which no doubt is unpleasant.
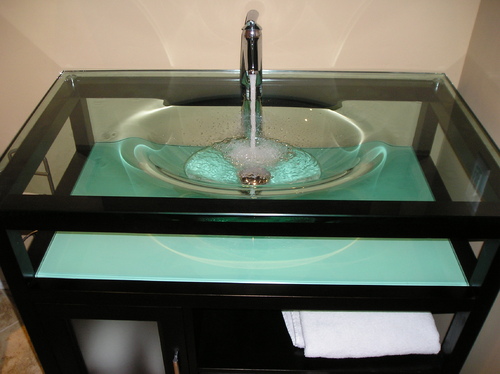
These European sinks, as I like to refer to them as, are very attractive and obviously look better than the traditional style do however, they do not have overflow provisions. If the water is left to run by let’s say the little ones, then you know it won’t take much for it to overflow and before you know it water is leaking in the bathroom and beyond.
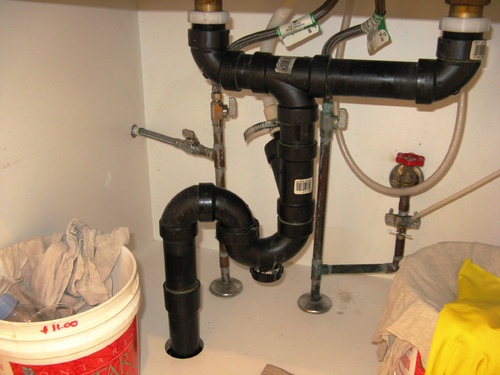
You will recall what a P-trap was from reading about the double P-traps earlier – well let’s now introduce what is known as the S-Trap. It’s not really a trap as we discussed earlier because it doesn’t hold water to create the seal against sewer gas entry. The configuration of the piping downward from the horizontal section of pipe creates an ‘S’ shape. S-traps are not allowed because water will be siphoned from the ‘U’ portion of the configuration as the water is draining. Imagine being on a roller coaster as it goes up the track and then descends into a dip and over the next incline – well that is what will happen with water draining into an S-trap and as we stated previous, if there is no water in that ‘U’ portion of the pipe then there is nothing to prevent sewer gases from coming into the home via the sink. There is another problem with this piping – the horizontal configuration is not plumbed properly. The fitting used is incorrect and allows for water streams to collide so to speak into each other when both sinks are draining. Wrong use of fittings is a common issue found when inspecting the plumbing system.
Let’s examine this photo which has everything to do with the installation of a dishwasher. First off, look at the outlet – it’s too close to plumbing pipes which can leak and we all know water and electricity do not mix. Second, focus on the orange extension cord. The cord has been modified which is extremely unsafe. The end you see is the plug to the outlet which is fine however the other end has been stripped and hard wired into the dishwasher above the floor which you can’t see. Extension cords aren’t rated for use as electrical wiring. Dishwashers require being safely wired with approved electrical wiring from the dishwasher to the electrical panel. Third, you will notice a flexible supply line behind the black ABS pipe connected to a shutoff and routed up through the sub-floor which supplies water to the dishwasher. The shutoff should be under the Kitchen sink and readily accessible so that you can turn off water to the dishwasher if there is a leak or problem with it – otherwise you have to run downstairs and get a step ladder to shut off the water. Lastly, see the dishwasher discharge hose to the right (grey flexible plastic hose connected to the black ABS pipe). You’ll recall we discussed this in the double trap picture as to where this connection should be made – this connection yet again is made after the P-trap and is not protected against sewer gas entry into the home via the dishwasher. All of these issues with one installation.
Service Cable, Main Disconnect, Main Panel, Sub-Panels, Distribution Wiring, Plugs/Outlets, Switches, Light Fixtures, Junction Boxes, Smoke Alarms and Carbon Monoxide Detectors
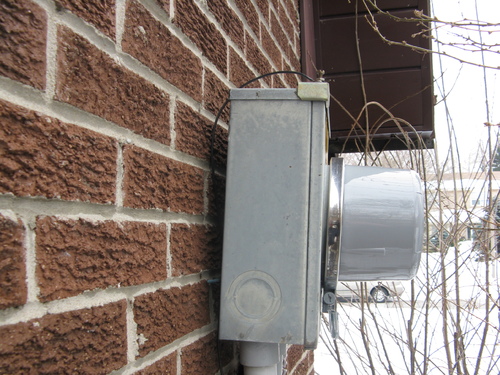
The meter base in this photo is coming off the wall and is obviously an unsafe situation. The cost for re-securing the meter base is usually borne by the homeowner because most Hydro companies are only responsible for the meter and the lines delivering the electricity to the home. Repairing this will require a Licensed Electrician to come out and re-secure the meter base to the wall however before doing so will require a site visit from Hydro Inspector to document the repair required and then put in a call for disconnecting power. Most hydro companies allow for one disconnect per year free of charge and any requirements for disconnection thereafter will be chargeable.
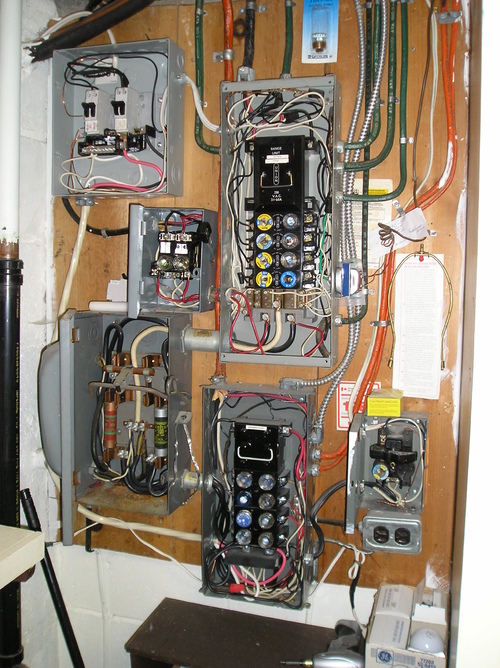
Most electrical systems in a residential home are for the most part straight forward with all wiring consolidated into one panel. Then there are some homes that have electrical systems like this one that has manifested itself into an elaborate wiring puzzle. While it is challenging to go through and time consuming, it is manageable. Knowing the do’s and don’ts of electricity can help identify unsafe conditions because ultimately that is what clients want to know. This setup was fraught with issues which required an electrician to come in to make it safe – a costly upgrade of course.
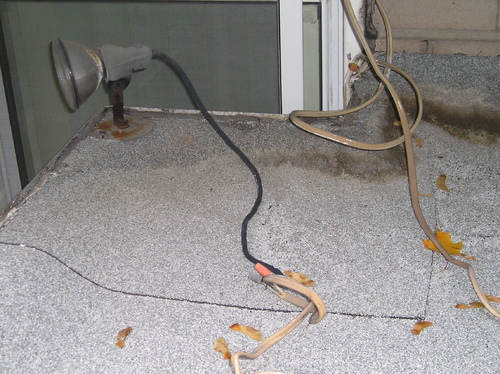
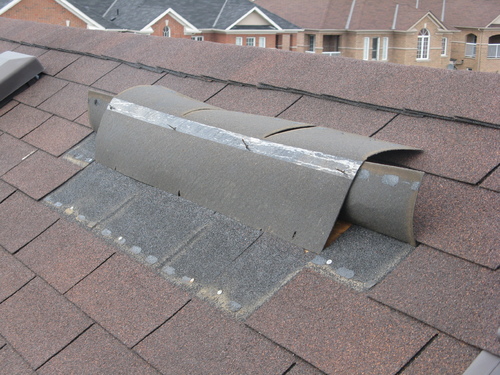
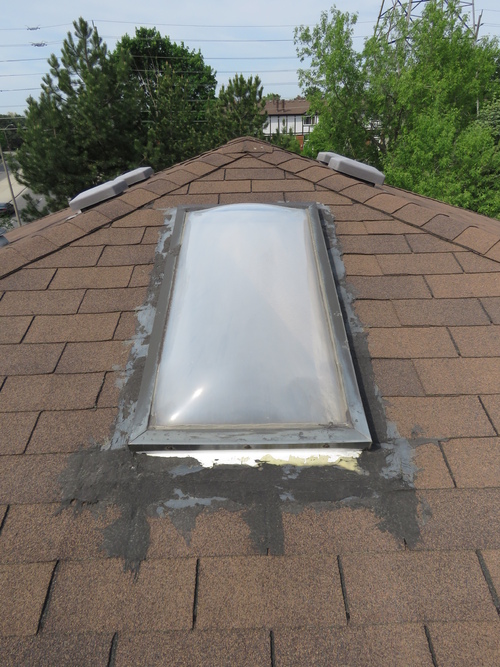
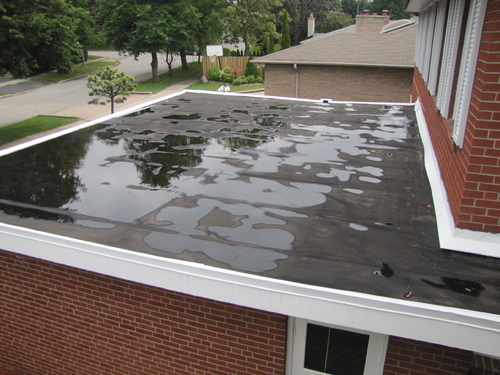
The plug for this plug-in spotlight has been cut-off and spliced into an electrical cable. The whole setup is unsafe in many ways. The plug should not have been cut-off, the splice is an open air connection – meaning it is not safely contained in a junction box, the electrical cable is not rated for outdoor use and this is on a roof top where there is water and snow accumulation. The other cable is problematic as well in case you’re wondering.

It’s always good to check behind electric free standing stoves, if they can be moved, to make sure that the stove has a plug and that there is an approved outlet instead of being hardwired – meaning the stove is wired all the way back to the panel without an outlet. The reason is that outlets have been required for a long time. Also, if stoves are hard wired the wire can disconnect from the stove when pulling it out and result in catastrophic conditions.


In keeping with the theme of looking behind the stove – in this photo you can see the orange extension cord that plugs into the outlet and disappears behind the wall. What does this cord power? Well you may recall reading about this very issue with respect to the dishwasher installation in the Plumbing section. Same thing here except this time they have spliced the other end of the extension cord and hard wired into range hood fan to power the fan. The fan requires being wired to the electrical system with approved electrical cable.
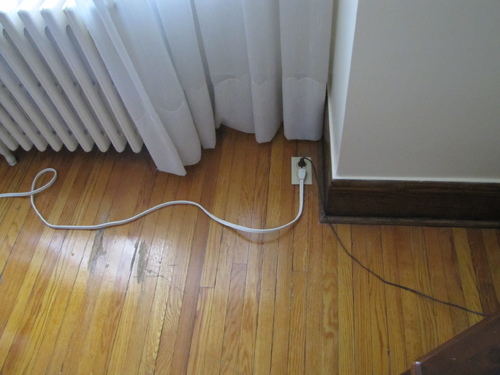
Outlets should never be installed on the floor. If there is a spill of any fluid on the floor that makes it to the plug the outcome will not be a good one. The radiator beside the outlet is a source of moisture for sure if it were to leak.
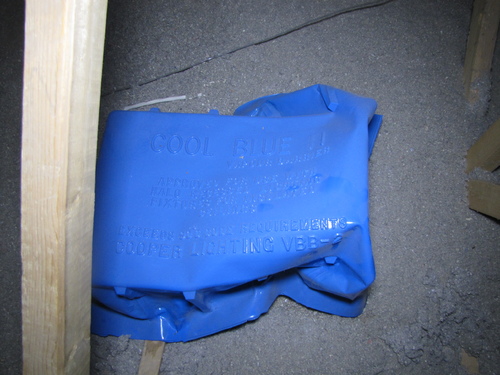

This is the Cool Blue VBB-2 Vapour Barrier product. Its intended function is to provide a seal around pot lights to reduce loss of conditioned air into the attic space for pot lights that do not have self sealing provisions built into them. The Cool Blue VBB-2 should be installed to the framing with the pot light installed into it and then sealing the area where the wires enter the boot. This wasn’t possible in this case because the pot lights were installed prior and are older however the flaps on the Cool Blue could have been sealed to the plywood around the base of the light. The wooden box is used to protect the insulation from the light because they are not IC rated meaning Insulation Contact. The other issue as you can see is the sloppy wiring and open electrical junction box. The options here were to replace all of these lights with newer ones or to correct the unsafe and inadequate installation of the existing lights and the Cool Blue Vapour barriers.
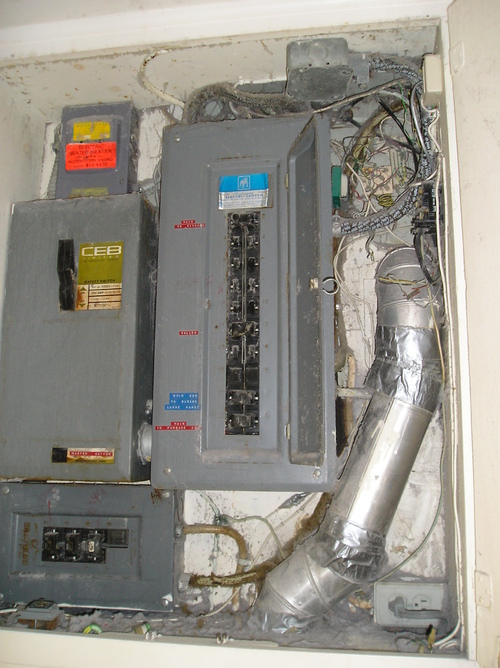
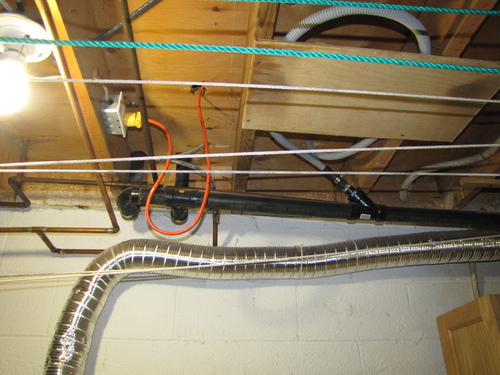
There are a couple of issues in this photo. The first one is the dryer duct being routed inside the electrical panel area. Notice the build up of lint which by the way is flammable and if there is this much lint imagine the amount of moisture escaping from the duct at the same time, a very unsafe situation to say the least. The other issue is the electrical panel. This is a Bull Dog Pushmatic brand. There are documented concerns with the safety of the breakers in the design, operation and on/off indication. This is definitely an older system and replacement was highly recommended as was removing the dryer duct from the area.
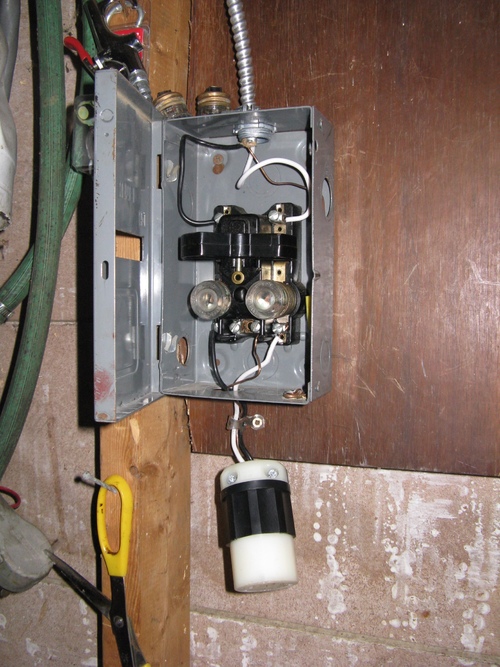
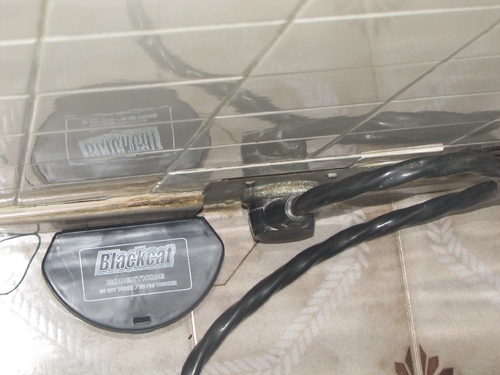
DIY electrical work is common and unsafe in almost all homes inspected. This is a twist lock receptacle which means when you insert the plug you twist it and it locks so that disconnecting between the receptacle and plug will not occur. So if there is tension on the cord that is attached to the tool you are using or you tug on the cord to get more slack – arcing can occur if the wires were to come away from the panel which can lead to fire conditions. This just exemplifies how dangerous it can be and the risk one exposes themselves to by wiring and utilizing this plug. It’s all ingenious until someone gets hurt.
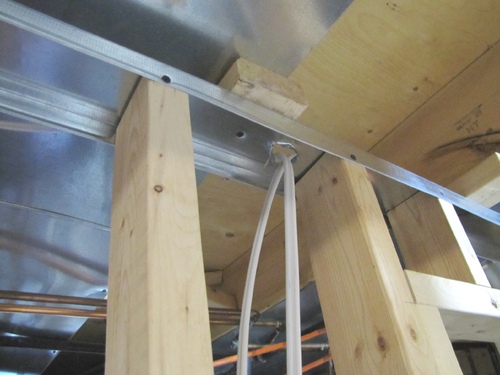
The basement in this home was in the middle of being renovated however the owner decided to sell before completing it. The issue here is the hole that was made in the steel stud leaving behind jagged edges. The electrical wires as you can see are abrading against the sharp metal. With vibration from walking on the floor above, these wires will fray and eventually electrify the steel stud. The hole should have been cleaned up and a plastic grommet installed to protect the wiring. If the home inspection had been performed after the fact when the basement was completely finished – this would not have been detected due to the limitations of a visual inspection. That’s why I request permits for all new wiring in the home because this is what could be lurking behind the walls.
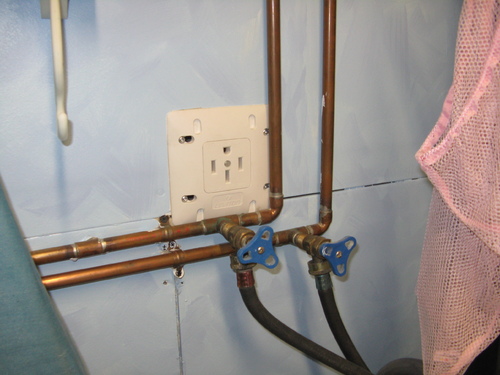
As we all know water and electricity do not mix. If the shutoffs leak or the rubber washer hoses bulge and burst, as they are prone to doing – then you have a catastrophic condition. This can be an avoidable situation by just re-locating the plumbing – it’s the easier of the two to move.
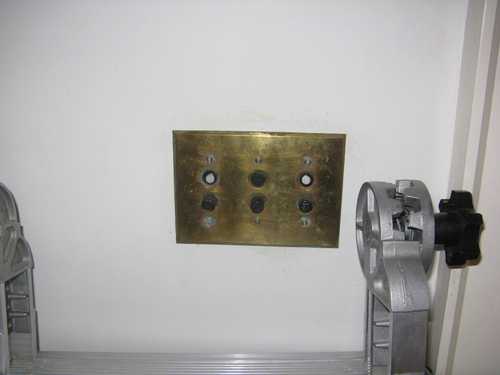
Vintage light switches like this one are a good indicator that knob & tube wiring may exist in the home. Most insurance companies will not insure homes with knob & tube wiring and if they do it will be at higher premiums and involve a whole set of circumstances.
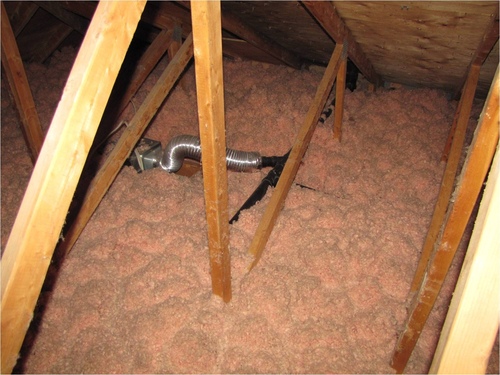
When exhaust fans are installed in the home, it is important to ensure that moisture and odor are being exhausted to the exterior. When inspecting this home from the exterior there were no exhaust fan hoods on the wall or the roof to indicate that an exhaust fan was installed in the 2nd floor bathroom. When I got into the attic it was quickly apparent how the moisture in the bathroom was being exhausted. You can see this exhaust fan is being exhausted into the venting system of the plumbing system which is not good. The venting system draws air into the pipes naturally which helps to regulate air pressure in the waste system to aid in free flow of waste and water and protect the traps. Inducing air into the system, well, obviously throws everything out of whack. Furthermore, the duct isn’t insulated which allows for moisture in the exhausted air to condense and run back toward the fan into the home.
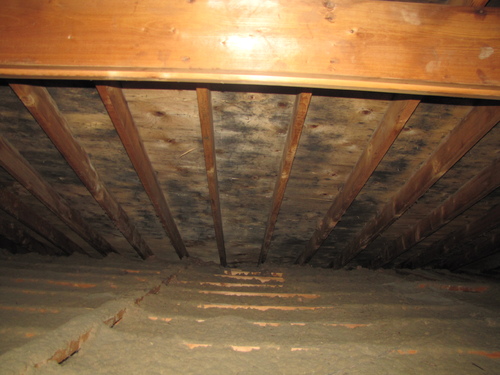
The roof sheathing in the attic as you can see is affected by what appears to be mold and if not addressed can lead to rot and deterioration of the roof sheathing. Mold in the attic can occur in many ways from poor ventilation, lack of insulation allowing for air leakage into the attic and condensing on the sheathing, deteriorated roof covering or exhaust fans venting into the attic space. All of which can occur in combination or as an individual source. The mold had to be tested to determine type and what remedial measures will be best to remove it safely. Of course, before any remediation is performed it is best to determine the source of the moisture so that mold will not occur again otherwise it will be a waste of money removing it.
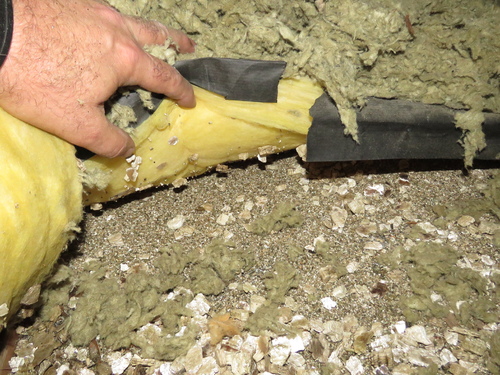


Older homes will sometimes contain varying types of insulation in the attic. It’s always a good idea to check under the top layer or layers because you never know what lies beneath. In this case there is the yellow fibreglass batt insulation installed over top of the vermiculite insulation. Vermiculite insulation may or may not contain asbestos. The only way to find out is to have samples taken and tested by a Certified Environmental Professional. If the Vermiculite is found to contain asbestos it is best to speak with your Mortgage and Insurance providers for advice and guidance because they may have conditions for being able to obtain financing or insurance respectively.
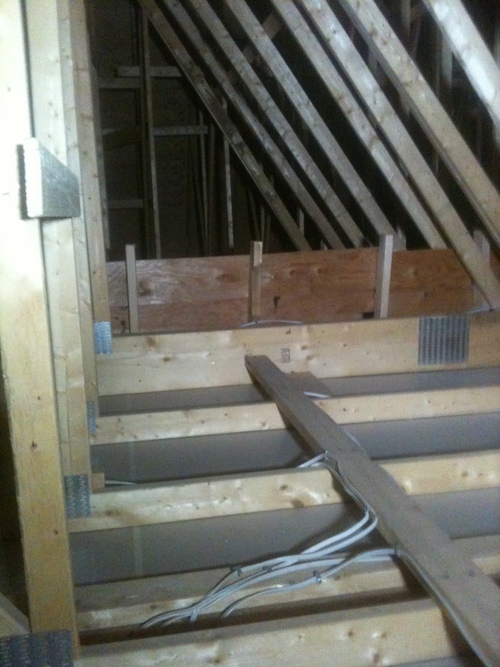
The insulation in this attic of a newly built home was never installed. In fact, this wasn’t discovered until my client hired me to perform the 1 year Warranty inspection. You could imagine what her reaction was when she found out that her attic had no insulation. She told me her house was so cold in the winter that she had to turn up the heat and shut off registers to other parts of the home in order to concentrate the heat to her bedroom and kitchen. Never underestimate the importance of having your new home inspected – you will be surprised at the deficiencies that can be found.